Important Facts:
- Works best on 30 house amenities classes (as this model is trained on pre-defined amenities)
- Achieved mAP@0.5:0.95 - 0.495 – close enough to be a viable product
- Built on Pytorch, trained using GCP (1 GPU - P1000), developed API using Flask
- Returns the inference (results) under 200 milliseconds using CPU
I started learning about computer vision from the basics as I wanted to apply those skills more in industrial automation. At the same time, many blogs and articles started screaming to create an end-to-end machine learning model to understand the engineering behind the usefulness of the machine learning model.
Then came across a random tweet suggesting build a hobby product that I would like to use. After toiling a lot, I came across this applied-ml GitHub by Eugene Yan. This an awesome collection of application-oriented Machine learning models being used in the industry. In the computer vision section, this airbnb paper caught my eye and I thought this is a cool product I would like to see for myself, and at the same time, I can learn important and new engineering skills needed for building an end-to-end machine learning model by following this article.
This article was very detailed, almost step by step method one can follow to create a business need machine learning model. As I was learning new aspects of machine learning engineering, I wanted to follow the article step by step and replicate it and achieve similar results.
BUSINESS CASE:
Purpose of Project and Business case of this machine learning model:
- The purpose of this project is to build an object detection model and be able to create an interface to use the model. Overall, I wanted to learn the skills required to develop an end-to-end machine learning app.
- This model can help in finding the essential amenities in a house from the photos taken by the owner and adds them to the listing automatically, thereby decreasing the errors of a chance of missing out of humans. This model could help both the lister, consumer, and Airbnb to have the right list of amenities listed on the app and also become a significant factor in determining the amount of charge a listing be listed.
Steps Involved:
- Data Acquisition
- Preprocessing – Data formatting and Munging
- Model Training
- Evaluation and Inference
- API Development
- Deployment on to WEB
- Future Work and Scope
Data Acquisition
The most important part of this model is building a dataset of images of house amenities. As mentioned in the article, Airbnb took the majority images from the internal database and the remaining images from the Open images dataset. But before building the dataset, they had to decide the taxonomy, amenity labels. The taxonomy here should help the specific business needs. After reviewing, they came with 40 amenity classes like kitchen, bathroom, and bedroom, such as a gas stove, oven, refrigerator, bathtub, shower, towel, bed, pillow, etc. Being a business, they could build a huge image dataset from all sources. But being a hobby project and as an individual, we don’t have that luxury. So the next best thing is to use the available image datasets. As I was going through the article, I observed that the Airbnb engineering team used and started modeling with the images from the Open Image Dataset. So I thought why not me. I went through the classes in the Open images Dataset and came with 30 house amenities classes that could be useful for my model.
names: ['Bathtub', 'Bed', 'Billiard table', 'Ceiling fan', 'Coffeemaker', 'Couch', 'Countertop', 'Dishwasher', 'Fireplace', 'Fountain', 'Gas stove', 'Jacuzzi', 'Kitchen & dining room table', 'Microwave oven', 'Mirror', 'Oven', 'Pillow', 'Porch', 'Refrigerator', 'Shower', 'Sink', 'Sofa bed', 'Stairs', 'Swimming pool', 'Television', 'Toilet', 'Towel', 'Tree house', 'Washing machine', 'Wine rack']
From the Open Images dataset, I downloaded around 36k images for training, 1000 images for validation and 2500 images for testing purpose.
Preprocessing – Data formatting and Munging
Now for object detection, it’s not just images, but we also need labels to train. Luckily the open image dataset comes with annotation labels. I downloaded the annotations file and class file to build the label database.
Before creating an annotation dataset (a dataset with images and its labels), I have to decide on the model I am going to use. I started reading about all the object detection models that have been developed. R-CNN, Fast R-CNN, YOLO, EfficientDet, Detectron2, etc. I wanted to use Detectron2 as it was not only the most advanced detection model but also it provides the most flexibility in selecting the model from its model_zoo. Detectron2 takes the input in the coco-JSON format. But, I came across another article, where Daniel Bourke replicated the same Airbnb article using Detectron2. I started to think, what more I can do and how to differentiate myself by taking inputs from that article. At the same time, YOLOv5 was released and everyone was talking about for various reasons but one of them was that the results were astonishing. It was using a RESNET model. But hyper-parameters were not as flexible as DETECTRON2 to change. So I started to decide to use the YOLOv5 framework to build my model.
For Yolov5, I need the annotation database as a .txt file containing the box dimensions and classes for each image. Each image is represented by a .txt file and if that image has multiple classes, then the same .txt file will contain multiple rows with each class number and its corresponding dimensions.
This dataset is built using prepare.py which obtains modules from preprocessing and munge data. preprocessing module helps in getting images ids, annotations, dimensions of the respective images we have downloaded. munge_data helps in creating the annotations box data as YOLOv5 model requires.
It took me around 30min to one hour to create the dataset.
MODEL TRAINING
With 35k images, I ended up with 50k annotated labels. Before starting training, download the yolov5, and create a new YAML file containing the training and validation image paths, the number of classes(30), and the class names.
At this point, we have all the ingredients to train an amenities model. As mentioned on the GitHub pages of yolov5, to train run the command
python train.py --img 640
                --batch 8
                --epochs 60
                --data data/airbnb.yaml
                --cfg models/yolov5x.yaml
                --weights ''
                --name yolov5x_airbnb_results
                --cache
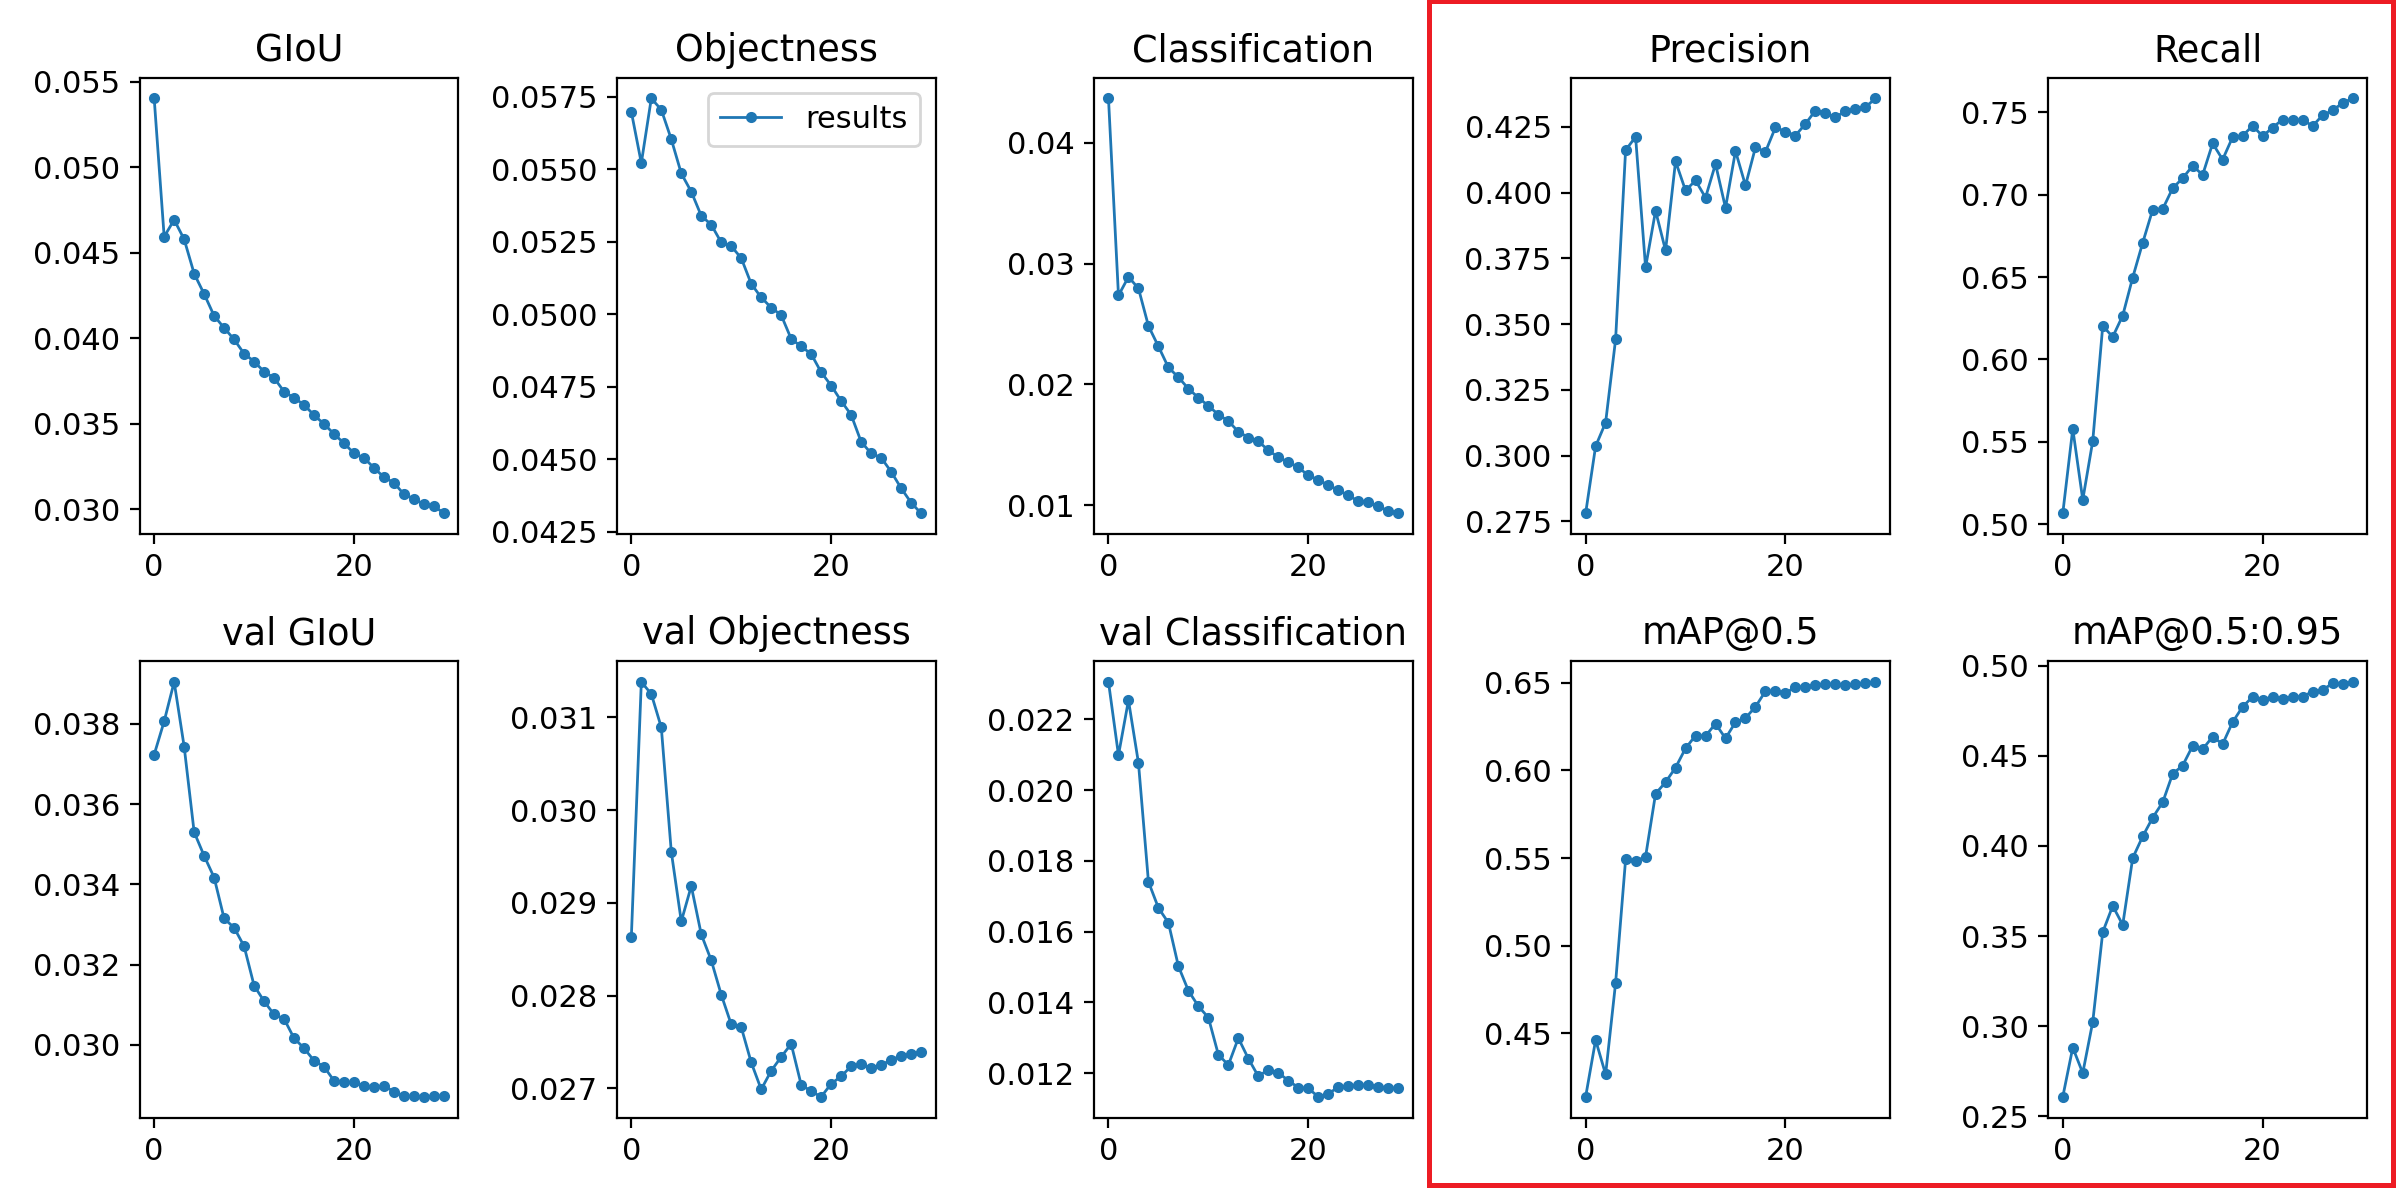
I took the largest model of Yolov5 which has 89M params. I took 8 batch size with 60 epochs, mention the YAML file we created to data, yolo5x.yaml to cfg. It took me around 30hours to train from start and achieve an mAP of 0.409. Once the training starts, we can check whether the training has been set up or not by checking the automatically generated file train_batch0_gt.jpg which included the ground truth for images. The metrics of this training are
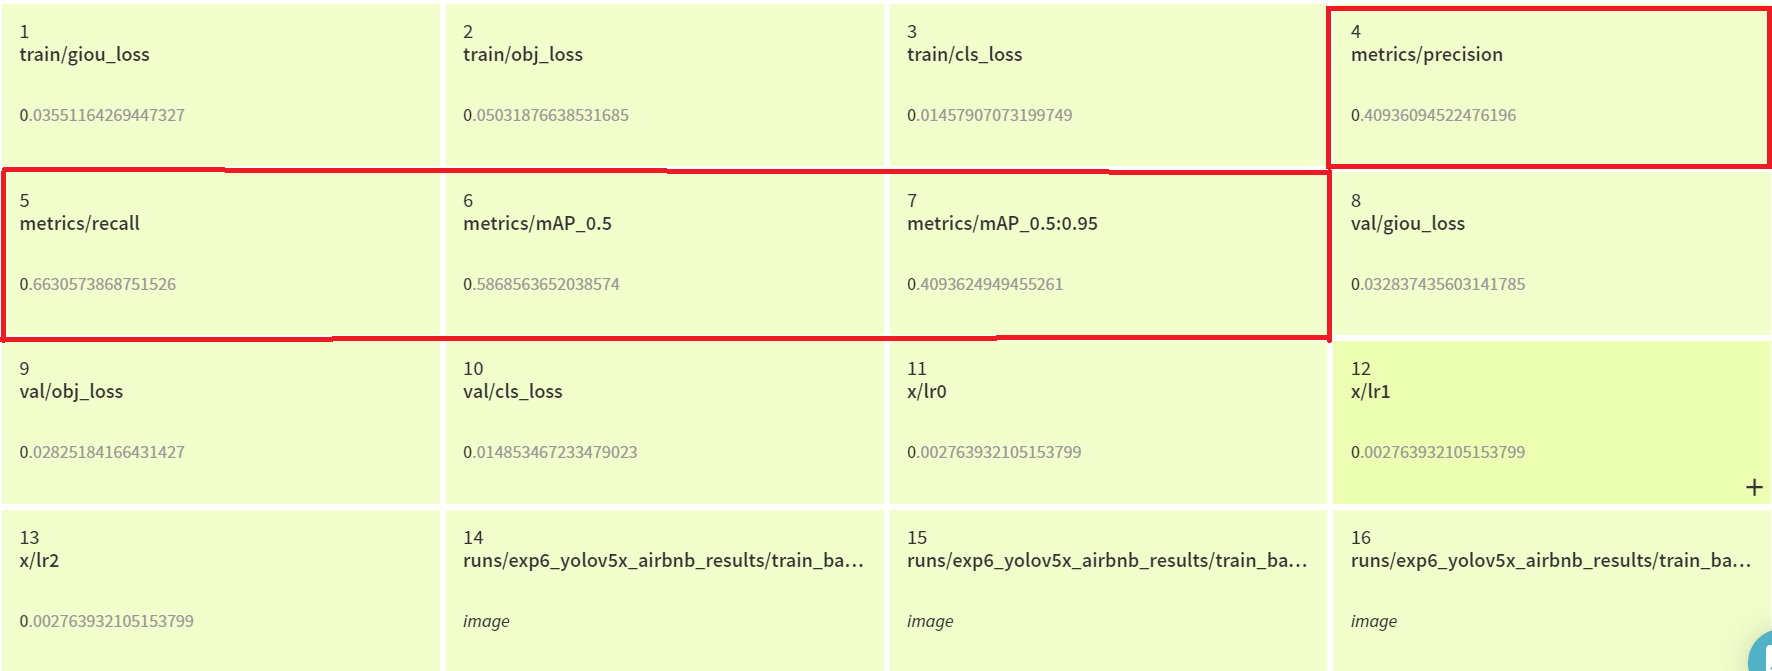
Airbnb engineers estimated that an mAP of at least 50% needed to build a minimal viable product and achieved an mAP of 68% using AutoML on 75k images. So I thought of ways to increase mAP. I started with the default hyper-parameters mentioned in the YOLOv5. Experimenting with hyper-parameters was not an option for me as it takes more computational time and money to experiment and that would be costly to me even though I am using GCP free credits. So, I looked at transfer learning.
As YOLOv5 has already been trained on the COCO dataset which has a similar image dataset, I downloaded the weights of the trained model, and just like the above, I started training using the downloaded weights but for only 30 epochs. This took me around 15hrs of training. The results are astonishing. As you see below, for 30 epochs, I achieved mAP -[0.5:0.95] – 49.5%. One can consider this as an achievement as per the initial hypothesis for being a minimum viable product.
This is pretty amazing, considering the Airbnb engineers worked on AutoML for three days to achieve an accuracy of 67%. YOLOv5 is amazing.
Evaluation/Predictions: YOLOv5 provides a lot of ways to check the results on new data. We can check with a folder of images all at once, or on a single image or with a URL link to the image, or through the webcam. At first, I evaluated the model using the download test dataset from the Open Images dataset. It contained around 2500 images, and with no weight initialization (the first) model, the model was able to predict only on 1000 images but with the transfer learning model, it was able to predict more than 1250 images. I forgot to check the accuracy of these predictions, but I am confident that the predictions on these images would have been more than 50% with a 0.3 confidence threshold and 0.4 IOU.
YOLOv5 also gives us the option to evaluate or predict with ensemble weights.
python detect.py --weights runs/exp5_yolov5x_airbnb_results/weights/best.pt runs/exp6_yolov5x_airbnb_results/weights/best.pt
                 --source dataset/images/test/
                 --output output/inference_right_weights
                 --img 640
                 --save-txt
I also tested the model using images from url and some images taken from my house. The predictions were spot on on most of the cases. For example check at the end of this write up.
API Development
Now the most difficult part for me. I never had to learn about APIs as I am from mechanical background. So learning flask and write an API using it for my machine learning was difficult for me and took a long time to come up.
python detect_flask.py
Deploying on to WEB
Unfortunately, I couldn’t deploy my model on to web because all free tier hosting website has an upper limit of 512mb and I couldn’t get model installation below 512mb. Pytorch latest version installation itself went more than 512mb. So there, I am attaching the images of locally hosted web app images below.
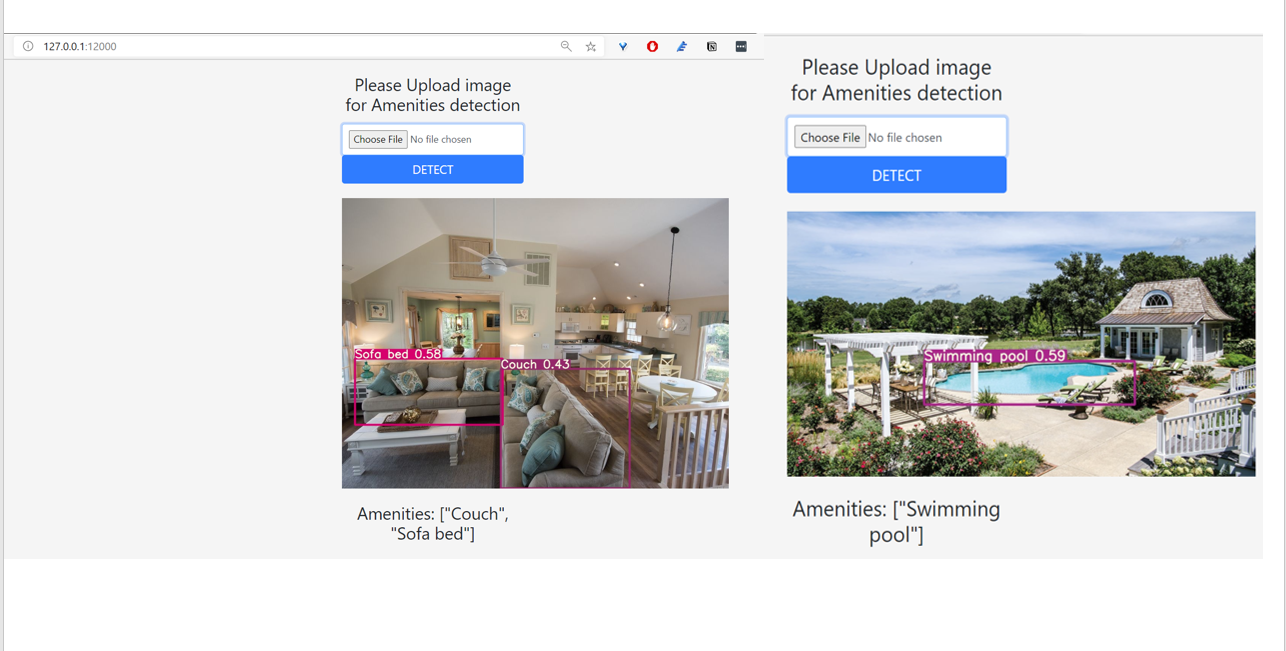

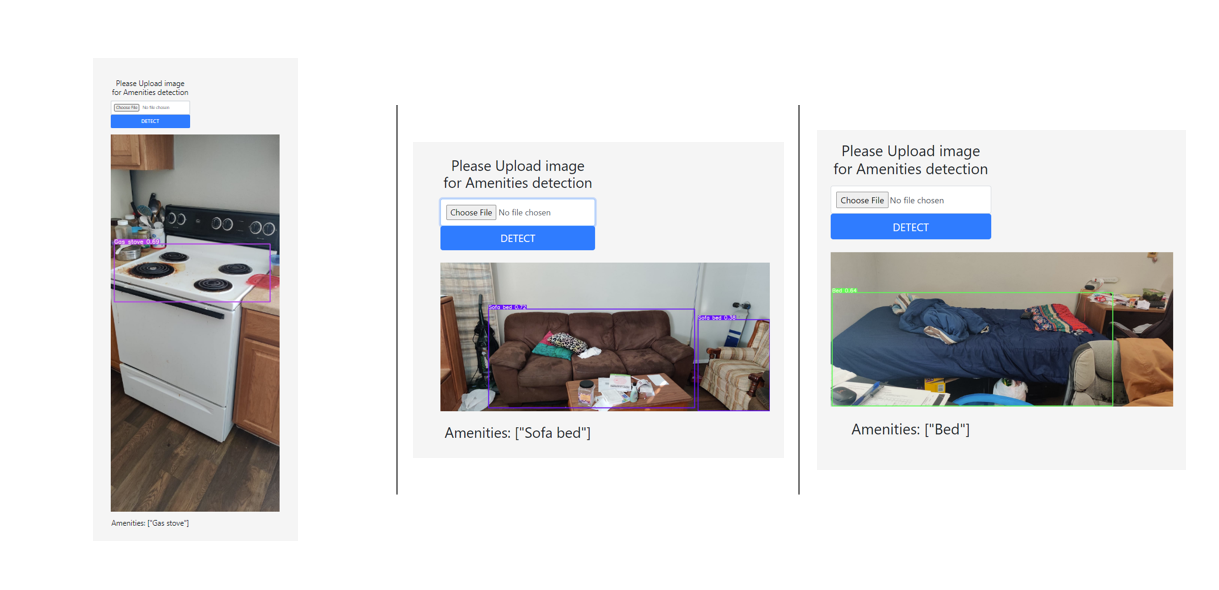
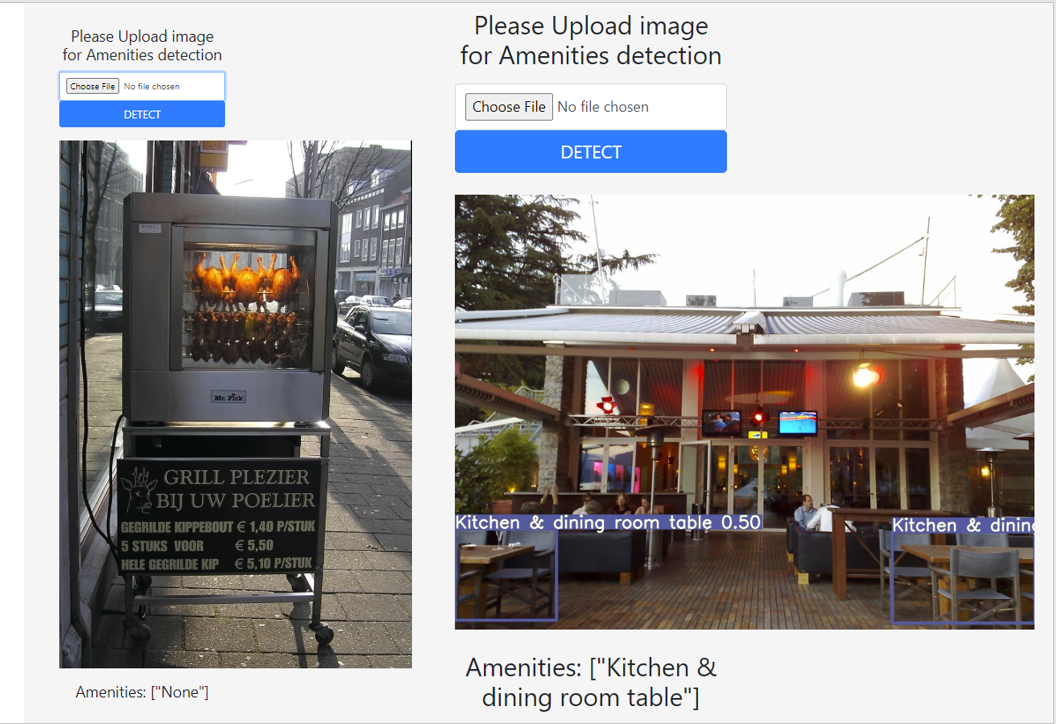
As you can see, the trained machine learning model web app hosted locally, the predictions are astonishing. Some of the images from my house and I was really surprised that the model was detecting those. We can also see it couldn’t detect the grill in the last image.
If given more computation, this model can be hosted on the web and made open to everyone to use.
But if you would like to run the flask API on your local machine, just start downloading the folder data, models, utils, weights, weights from releases (I have uploaded both the trained weights), detect_imgae.py and just run the command python detect_imgae.py
Future Work
- More hyperparameter tuning
- Hosting on web app and mobile app, accessible to everyone
- Collect more images and label dataset
Final Thoughts
With this project, I did learn a lot especially the 80% of machine learning models that are the things that happen in machine learning model development apart from building a model. I had to spend more than 150$ (of course, GCP free credits) on this model training and countless hours (more than a month along with my other semester work).
Coming to the most important question, can this model be used in a business case now? I think definitely yes. If we go by Airbnb engineers’ hypothesis of having a minimum of 50% mAP to have a minimum viable product, we did achieve a 49.5% mAP with 15 hours of training. I think if we can add more images to the dataset and train for more epochs with a bit of hyperparameter tuning, we can achieve better results and cross the 50% mAP within no time.
And More importantly……
I want to THANK from bottom of my heart to the Daniel Bourke, Abhisekh Thakur, Eugene Yan and most important YOLOv5 Ultra Analytics. I learned a lot of engineering from them through this project